

ObiJanKenobi
*Snickerdoodle*, *GingerScraps Ad Team
Over the weekend Marcia posted a question on the Just So Scrappy Fan Group Facebook page. She's just learning digital scrapping and she wanted to know how and why styles are used. First, let's talk about WHAT they are. Basically, they're little mini-scripts that tell Photoshop/Photoshop Elements to change the appearance of an object. The object could be a font, a paper item, a shape or almost anything. It's a lot easier to understand this concept if you can see it at work, so today's tutorial was born. I'll be using some layer styles created by Just So Scrappy's alter-ego, Ooh La La Scraps that coordinate with her Take Time to Be Kind bundle. Katie Castillo is the talent behind both design lines and she creates a bundle of styles for each of her collections. So let's have a look at what they are and how to use them.

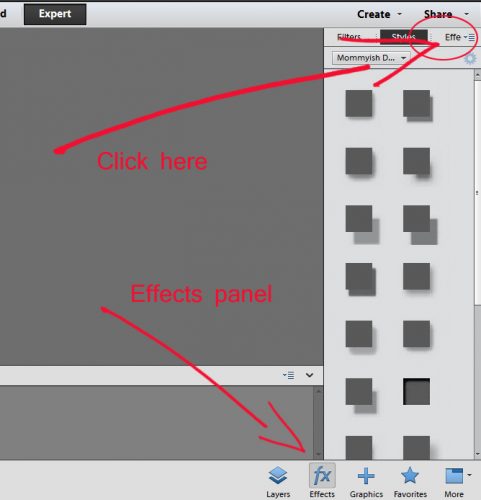
First, I had to load the style files into my software. After unzipping the files, I went to the Effects panel in Elements and clicked on the little stack of horizontal lines shown below.
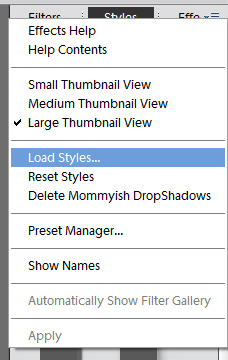
This menu opens up. Select Load Styles and find the folder with the desired styles in it. They have to be loaded one at a time, unfortunately.
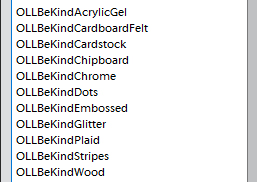
When I unzipped these styles files, I decided to rename the files for the purposes of this tutorial. In the Effects panel this is what I see. You don't have to do that, I just wanted to make everything quite clear.
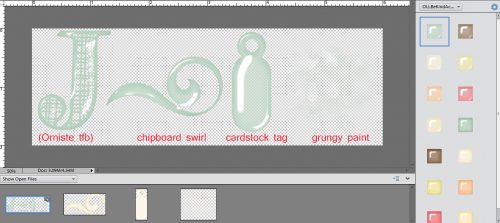
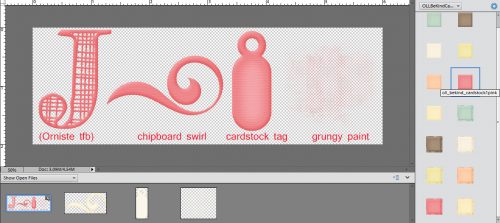
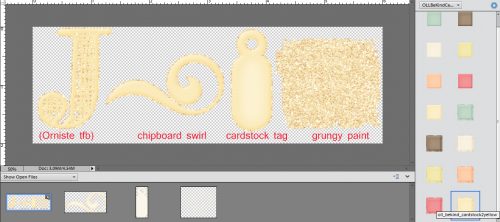
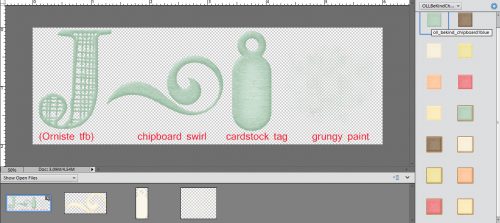
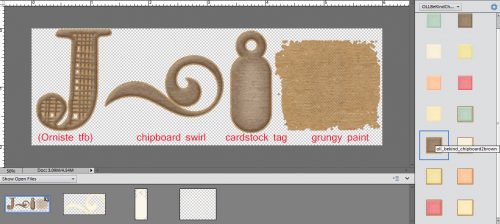
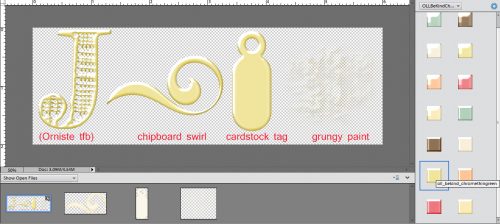
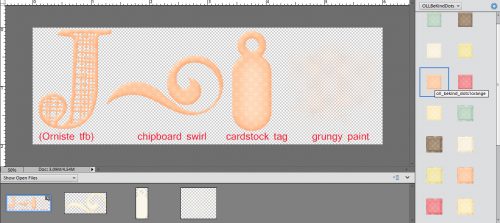
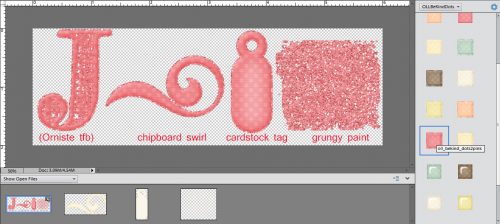
The screenshots below show what each different type of style does to an object. I used a large, open font, a chipboard swirl, a cardstock tag and some grungy paint from the Take Time to Be Kind elements pack to demonstrate. Each style comes in all of the colours in the palette for the collection. See what effects they have on different objects.
Acrylic Gel (Transparent Blue)
Acrylic Gel (Opaque Brown)
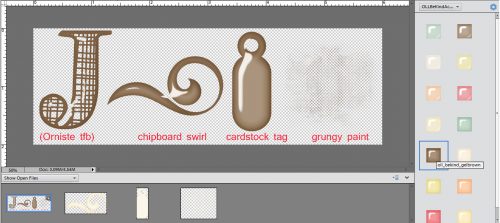
Cardboard (Corrugated Cream)
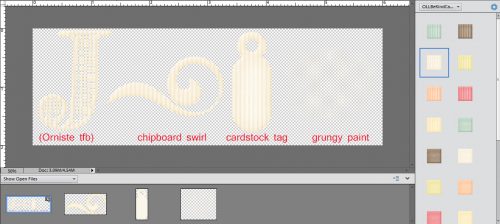
Cardboard (Smooth Green)
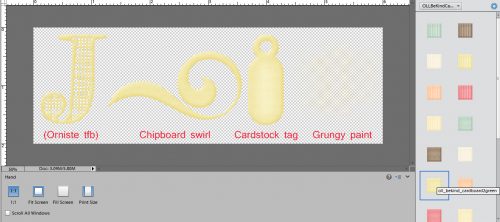
Felt (Orange)
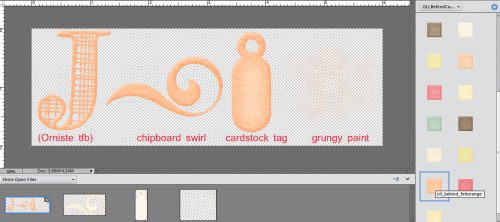
Cardstock (Textured Pink)
Cardstock (Glitter Edge Yellow)
Chipboard (Nubby Blue)
Chipboard (Beveled Brown)
Chrome (Fat Cream)
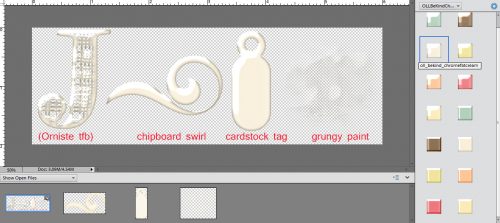
Chrome (Thin Green)
Dots (Orange)
Dots (Glitter Edge Pink)
Dots (Acrylic Gel Yellow)
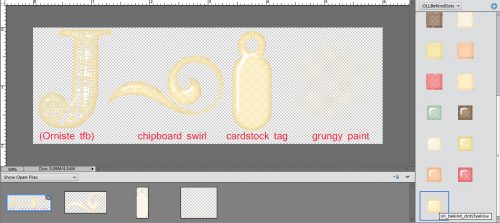
Embossed (Dots Blue)
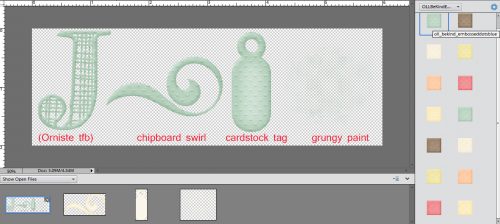
Embossed (Brocade Brown)
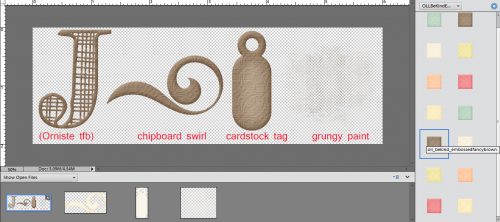
Glitter (Chunky Cream)
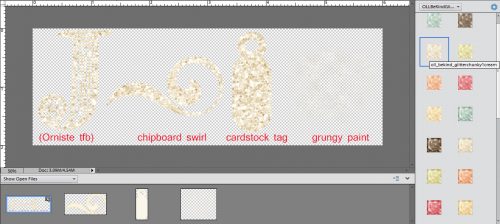
Glitter (Chunky Gloss Green)
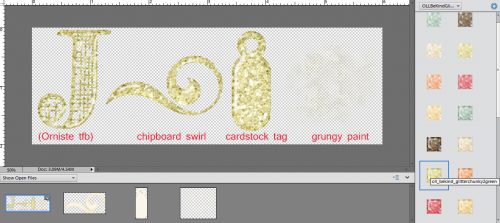
Glitter (Fine Orange)
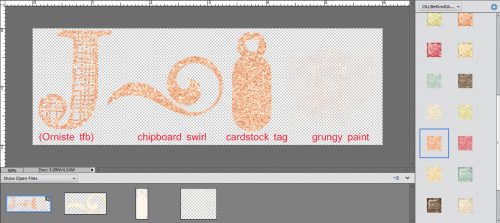
Glitter (Fine Gloss Pink)
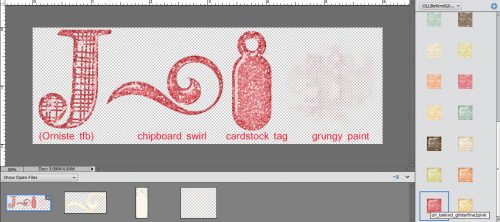
Plaid (Plain Yellow)
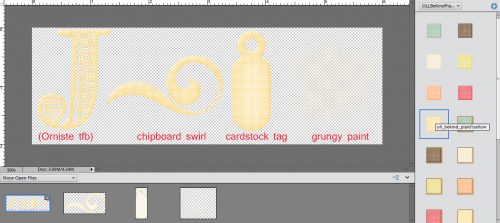
Plaid (Kraft Edge Blue)
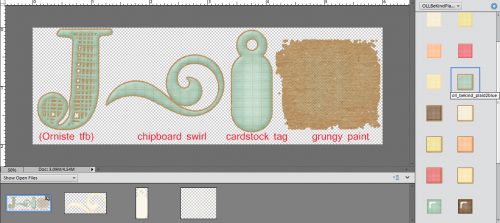
Plaid (Gloss Brown)
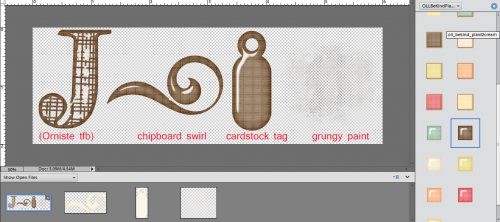
Stripes (Plain Cream)
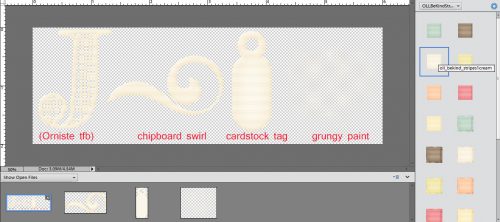
Stripes (Glitter Edge Green)
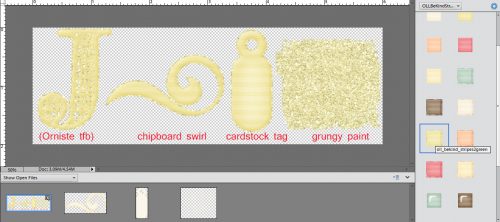
Stripes (Gloss Orange)
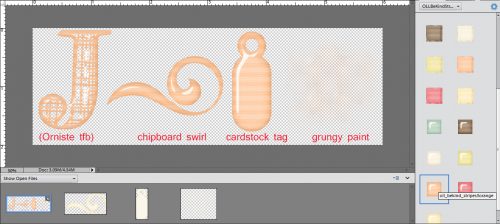
Wood (Smooth Pink)
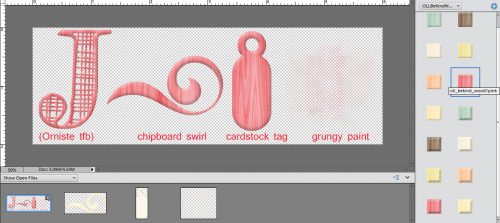
Wood (Bevel Yellow)
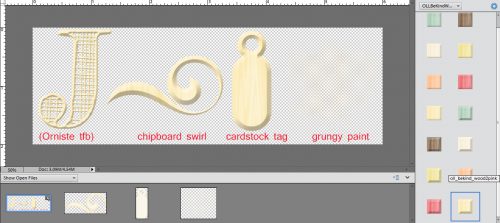
That has given you a look at the colours and textures these styles provide. As you can see, grungy paint is fabulous with a glitter style applied but downright ugly with most of the others. The swirl looks great with any of them, the tag takes on a completely different look. The font wasn't perhaps the best choice for this purpose. I could see myself creating a matching alpha for this collection using a chunky, bold font. But Katie has already included some stunning alphas so I'll save my efforts for some other purpose.
That was a very simplistic look at what styles can do. But let's go a step further and COMBINE some styles to really jazz up an object. I'm using the swirl again because it's pretty great already, but I might want it to be even more eye-catching on my layout. I resized the canvas so I'd have some room to maneuver. [Image>Resize>Canvas Size or WSNH: CTRL/CMD>ALT>C]
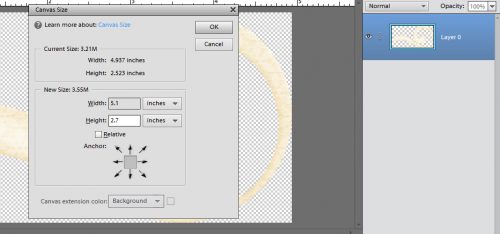
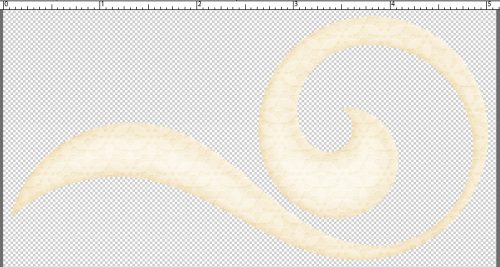
You might notice that this swirl has some texture to it. Don't be concerned, because styles cover that up.
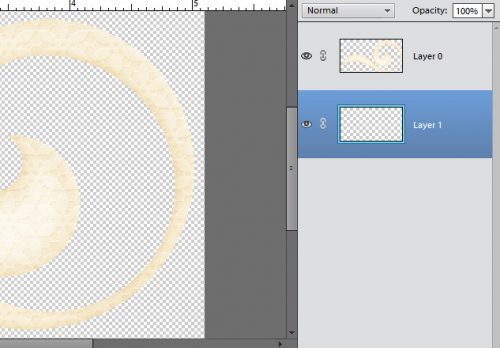
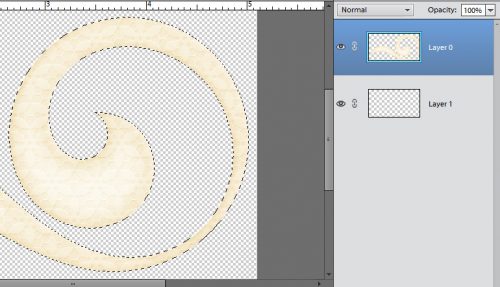
I created a new layer underneath the swirl by clicking on the sheet of paper icon above the layer panel while holding the CTRL/CMD key down. Then, with the CTRL/CMD key still held down I clicked on the swirl thumbnail to select its edges. See the marching ants?
I want to enlarge or expand that selection.
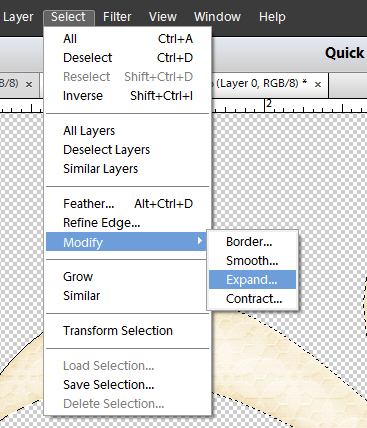
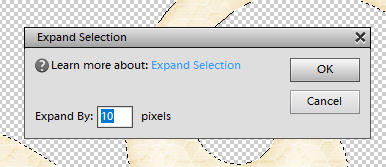
I chose to expand by 10 pixels.
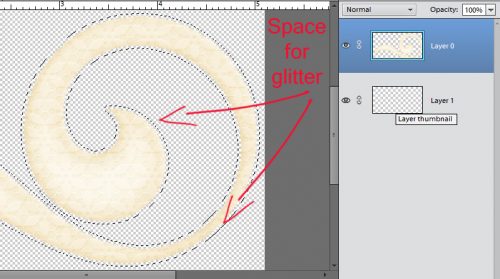
See the space around the swirl? I'm going to fill that, first with a solid colour and then with glitter.
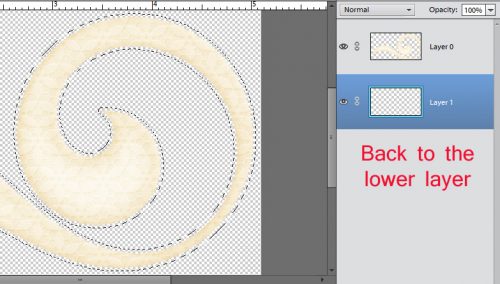
I selected the lower, blank layer for this step.
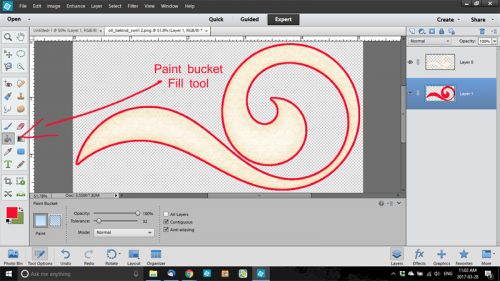
I used the Fill tool (aka the Paint Bucket) and the colour in the foreground. It doesn't matter what colour this is.
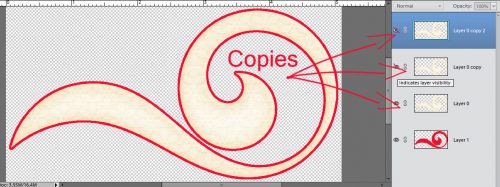
Before I forgot to do it, I Duplicated the swirl layer (NOT the red, solid colour fill layer) [WSNH: CTRL/CMD>J] and it's these layers that I'm going to play with next. But first, I turned off all visibility for all but the lowest of swirl layers.
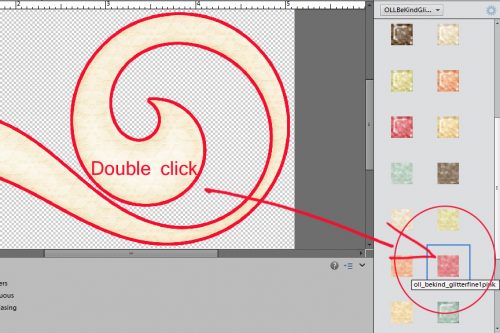
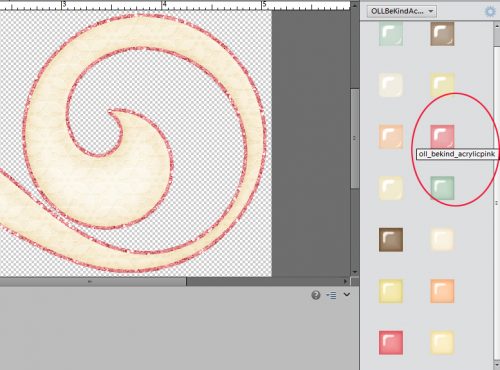
I then went to the Effects panel and selected the OLL Be Kind Glitter style menu. Then I double-clicked on the pink fine glitter style.
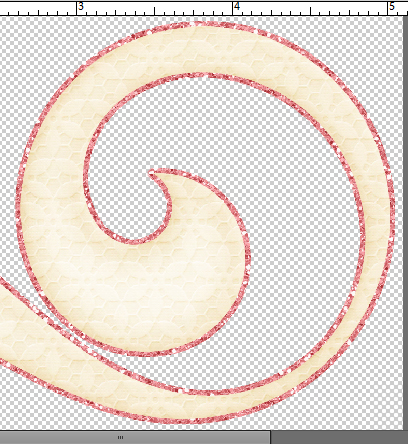
And presto! I have a nice glitter edge, the size of which I chose.
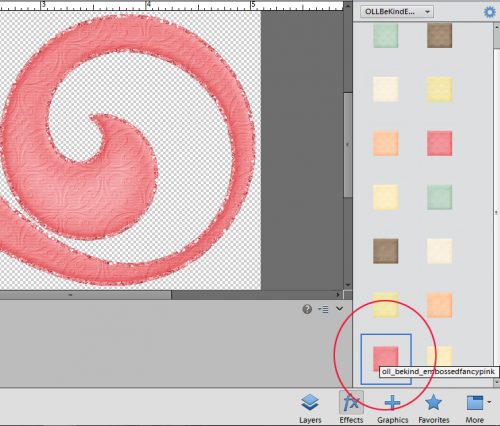
Moving up to the first swirl layer, I then selected the OLL Be Kind Embossed brocade style, also in pink.
Moving up to the middle swirl layer, I selected the transparent acrylic gel style.
Whoa!! That looks awesome!! But... the brocade effect has disappeared.
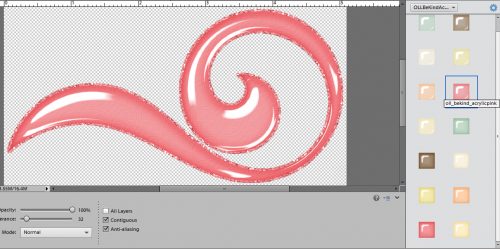
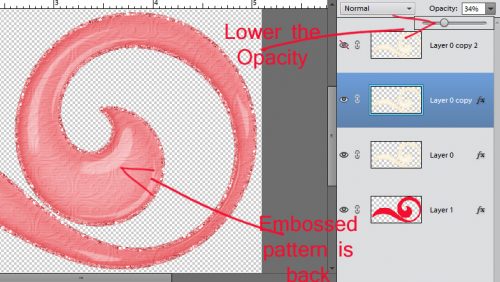
So I decreased the Opacity of the acrylic gel layer. Now I can see the brocade effect but still have some nice gloss on
it. (If you think you need to so you're not confused, you can change the name of the layer to the style you've applied.)
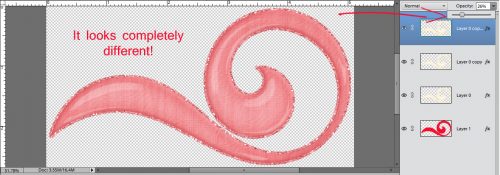
On the very top layer, I selected the smooth pink wood style. It adds a little bit of a bevel and a smidge of a shadow. But it also completely covers up everything underneath it.
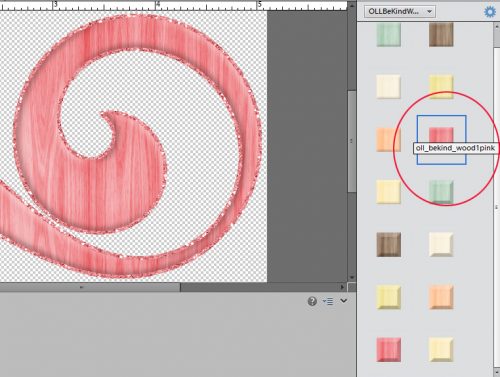
Decreasing the Opacity lets some wood grain and brocade effects to show through, while keeping the gloss too! If I was moving it onto a layout, I'd select all the layers and either link them together by clicking on the little chain icon, or merge them together [WSNH: CTRL/CMD>E].
I hope this helps you see the potential with styles. They're an incredibly powerful tool and can really elevate your scrapping skills. It's a lot of fun to play with them just to see what they do. Don't be afraid to try different combinations because if you don't like it, CTRL/CMD>Z will undo it. Really, the sky's the limit here!
Remember, if you’ve used a technique from these tutorials, post your finished layout in the GingerScraps Facebook Tutorial Tuesday Challenge Gallery for an opportunity to have YOUR chance to challenge me. If you’re not a Facebooker, you can post a link to the layout you’ve created with the tutorial you used in the comments section here on the Blog. I’ll get a notification and will then enter you into the draw. The first week of each month I’ll have a random draw of all entries and the winner will be announced at the end of the first tutorial of that month.
See you all again next week!
First, I had to load the style files into my software. After unzipping the files, I went to the Effects panel in Elements and clicked on the little stack of horizontal lines shown below.
This menu opens up. Select Load Styles and find the folder with the desired styles in it. They have to be loaded one at a time, unfortunately.
When I unzipped these styles files, I decided to rename the files for the purposes of this tutorial. In the Effects panel this is what I see. You don't have to do that, I just wanted to make everything quite clear.
The screenshots below show what each different type of style does to an object. I used a large, open font, a chipboard swirl, a cardstock tag and some grungy paint from the Take Time to Be Kind elements pack to demonstrate. Each style comes in all of the colours in the palette for the collection. See what effects they have on different objects.
Acrylic Gel (Transparent Blue)
Acrylic Gel (Opaque Brown)
Cardboard (Corrugated Cream)
Cardboard (Smooth Green)
Felt (Orange)
Cardstock (Textured Pink)
Cardstock (Glitter Edge Yellow)
Chipboard (Nubby Blue)
Chipboard (Beveled Brown)
Chrome (Fat Cream)
Chrome (Thin Green)
Dots (Orange)
Dots (Glitter Edge Pink)
Dots (Acrylic Gel Yellow)
Embossed (Dots Blue)
Embossed (Brocade Brown)
Glitter (Chunky Cream)
Glitter (Chunky Gloss Green)
Glitter (Fine Orange)
Glitter (Fine Gloss Pink)
Plaid (Plain Yellow)
Plaid (Kraft Edge Blue)
Plaid (Gloss Brown)
Stripes (Plain Cream)
Stripes (Glitter Edge Green)
Stripes (Gloss Orange)
Wood (Smooth Pink)
Wood (Bevel Yellow)
That has given you a look at the colours and textures these styles provide. As you can see, grungy paint is fabulous with a glitter style applied but downright ugly with most of the others. The swirl looks great with any of them, the tag takes on a completely different look. The font wasn't perhaps the best choice for this purpose. I could see myself creating a matching alpha for this collection using a chunky, bold font. But Katie has already included some stunning alphas so I'll save my efforts for some other purpose.
That was a very simplistic look at what styles can do. But let's go a step further and COMBINE some styles to really jazz up an object. I'm using the swirl again because it's pretty great already, but I might want it to be even more eye-catching on my layout. I resized the canvas so I'd have some room to maneuver. [Image>Resize>Canvas Size or WSNH: CTRL/CMD>ALT>C]
You might notice that this swirl has some texture to it. Don't be concerned, because styles cover that up.
I created a new layer underneath the swirl by clicking on the sheet of paper icon above the layer panel while holding the CTRL/CMD key down. Then, with the CTRL/CMD key still held down I clicked on the swirl thumbnail to select its edges. See the marching ants?
I want to enlarge or expand that selection.
I chose to expand by 10 pixels.
See the space around the swirl? I'm going to fill that, first with a solid colour and then with glitter.
I selected the lower, blank layer for this step.
I used the Fill tool (aka the Paint Bucket) and the colour in the foreground. It doesn't matter what colour this is.
Before I forgot to do it, I Duplicated the swirl layer (NOT the red, solid colour fill layer) [WSNH: CTRL/CMD>J] and it's these layers that I'm going to play with next. But first, I turned off all visibility for all but the lowest of swirl layers.
I then went to the Effects panel and selected the OLL Be Kind Glitter style menu. Then I double-clicked on the pink fine glitter style.
And presto! I have a nice glitter edge, the size of which I chose.
Moving up to the first swirl layer, I then selected the OLL Be Kind Embossed brocade style, also in pink.
Moving up to the middle swirl layer, I selected the transparent acrylic gel style.
Whoa!! That looks awesome!! But... the brocade effect has disappeared.
So I decreased the Opacity of the acrylic gel layer. Now I can see the brocade effect but still have some nice gloss on
it. (If you think you need to so you're not confused, you can change the name of the layer to the style you've applied.)
On the very top layer, I selected the smooth pink wood style. It adds a little bit of a bevel and a smidge of a shadow. But it also completely covers up everything underneath it.
Decreasing the Opacity lets some wood grain and brocade effects to show through, while keeping the gloss too! If I was moving it onto a layout, I'd select all the layers and either link them together by clicking on the little chain icon, or merge them together [WSNH: CTRL/CMD>E].
I hope this helps you see the potential with styles. They're an incredibly powerful tool and can really elevate your scrapping skills. It's a lot of fun to play with them just to see what they do. Don't be afraid to try different combinations because if you don't like it, CTRL/CMD>Z will undo it. Really, the sky's the limit here!
Remember, if you’ve used a technique from these tutorials, post your finished layout in the GingerScraps Facebook Tutorial Tuesday Challenge Gallery for an opportunity to have YOUR chance to challenge me. If you’re not a Facebooker, you can post a link to the layout you’ve created with the tutorial you used in the comments section here on the Blog. I’ll get a notification and will then enter you into the draw. The first week of each month I’ll have a random draw of all entries and the winner will be announced at the end of the first tutorial of that month.
See you all again next week!


 Yay!
Yay!